Automated API Document
APIドキュメントの自動化
Automated document is a very cool feature that I wish to have. Now it became real in Beego. As I said Beego will not only boost the development of API but also make the API easy to use for the user. Ok, let’s try it out now. First create a new API application by bee api beeapi
自動ドキュメントは、欲しい非常にクールな機能です。beegoでは今となっては現実となりました。私が言ったようにboogoは、 APIの開発を後押しするだけでなく、ユーザーにとって使いAPIが容易になるわけではありません。大丈夫です。今それを試してみましょう。最初のbeego api beeapiによる新しいAPIアプリケーションを作成
API global settings
routers/router.goのトップにコメントを追加してください:
// @APIVersion 1.0.0
// @Title mobile API
// @Description mobile has every tool to get any job done, so codename for the new mobile APIs.
// @Contact astaxie@gmail.com
package routers
The comments above set the global information. The available settings: 上のコメントはグローバル情報として設定しています。有用な設定:
- @APIVersion
- @Title
- @Description
- @Contact
- @TermsOfServiceUrl
- @License
- @LicenseUrl
Router Parsing
Right now automated API document only supports namespace+Include and only supports two levels parsing. The first level is API version and the second level is the modules.
ルータの構文解析
今自動化されたAPIのドキュメントでは、名前空間をサポートしています`+含めるとのみ解析する2つのレベルがサポートされています。最初のレベルは、APIバージョンであり、第二のレベルは、モジュールです。
func init() {
	ns :=
		beego.NewNamespace("/v1",
			beego.NSNamespace("/customer",
				beego.NSInclude(
					&controllers.CustomerController{},
					&controllers.CustomerCookieCheckerController{},
				),
			),
			beego.NSNamespace("/catalog",
				beego.NSInclude(
					&controllers.CatalogController{},
				),
			),
			beego.NSNamespace("/newsletter",
				beego.NSInclude(
					&controllers.NewsLetterController{},
				),
			),
			beego.NSNamespace("/cms",
				beego.NSInclude(
					&controllers.CMSController{},
				),
			),
			beego.NSNamespace("/suggest",
				beego.NSInclude(
					&controllers.SearchController{},
				),
			),
		)
	beego.AddNamespace(ns)
}
アプリケーションのコメント
コメントの最も重要な部分です。例えば:
package controllers

import "github.com/astaxie/beego"

// CMS API
type CMSController struct {
	beego.Controller
}

func (c *CMSController) URLMapping() {
	c.Mapping("StaticBlock", c.StaticBlock)
	c.Mapping("Product", c.Product)
}

// @Title getStaticBlock
// @Description get all the staticblock by key
// @Param	key		path 	string	true		"The email for login"
// @Success 200 {object} models.ZDTCustomer.Customer
// @Failure 400 Invalid email supplied
// @Failure 404 User not found
// @router /staticblock/:key [get]
func (c *CMSController) StaticBlock() {

}

// @Title Get Product list
// @Description Get Product list by some info
// @Success 200 {object} models.ZDTProduct.ProductList
// @Param	category_id		query	int	false		"category id"
// @Param	brand_id	query	int	false		"brand id"
// @Param	query	query	string 	false		"query of search"
// @Param	segment	query	string 	false		"segment"
// @Param	sort 	query	string 	false		"sort option"
// @Param	dir 	query	string 	false		"direction asc or desc"
// @Param	offset 	query	int		false		"offset"
// @Param	limit 	query	int		false		"count limit"
// @Param	price 			query	float		false		"price"
// @Param	special_price 	query	bool		false		"whether this is special price"
// @Param	size 			query	string		false		"size filter"
// @Param	color 			query	string		false		"color filter"
// @Param	format 			query	bool		false		"choose return format"
// @Failure 400 no enough input
// @Failure 500 get products common error
// @router /products [get]
func (c *CMSController) Product() {

}
We defined the comment above for CMSController which will show for this module. Then we need to define the comment for every functions. Below is the supported comments:
このモジュールが表示されるCMSControllerのため、上記のコメントを定義しました。その後、すべての機能のためのコメントを定義する必要があります。以下はサポートされているコメントです:
-
@Title
The title for this API. it’s a string, all the content after the first space will be parsed as the title. このAPIのタイトルです。それは最初のスペースの後にすべてのコンテンツがタイトルとして解析され、文字列です。
-
@Description
The description for this API. it’s a string, all the content after the first space will be parsed as the description.
-
@Param
@Paramdefines the parameters sent to the server. There are five columns for each@Param:- parameter name;
- parameter sending type; It can be
form,query,path,bodyorheader.formmeans the parameter send by POST.querymeans the parameter in url send by GET.pathmeans the parameter in the url path, such as key in the former example.bodymeans the raw data send from request body.headermeans the parameter in request header. - parameter data type
- required
- comment
-
@Success
The success message returned to client. Three parameters.
- status code.
- return type; Must wrap with {}.
- returned object or string. For {object}, use path and the object name of your project here and
beetool will look up the object while generate the docs. For examplemodels.ZDTProduct.ProductListrepresentsProductListobject under/models/ZDTProduct
Use space to separate these three parameters
-
@Failure
The failure message returned to client. Two parameters separated by space.
- status code.
- Error message
-
@router
Router information. Two parameters separated by space.
- The request’s router address.
- Supported request methods. Wrap in
[]. Use,to separate multiple methods.
Generate document automatically
以下が動作させるためのステップです:
- Enable docs by setting
EnableDocs = trueinconf/app.conf conf/app.confにEnableDocs = trueを設定することにより、ドキュメントを有効にしてくださいmain.goにて`_ “beeapi/docs"をインポートしてください。- APIアプリケーションの実行と自動的に文書を再構築するために、
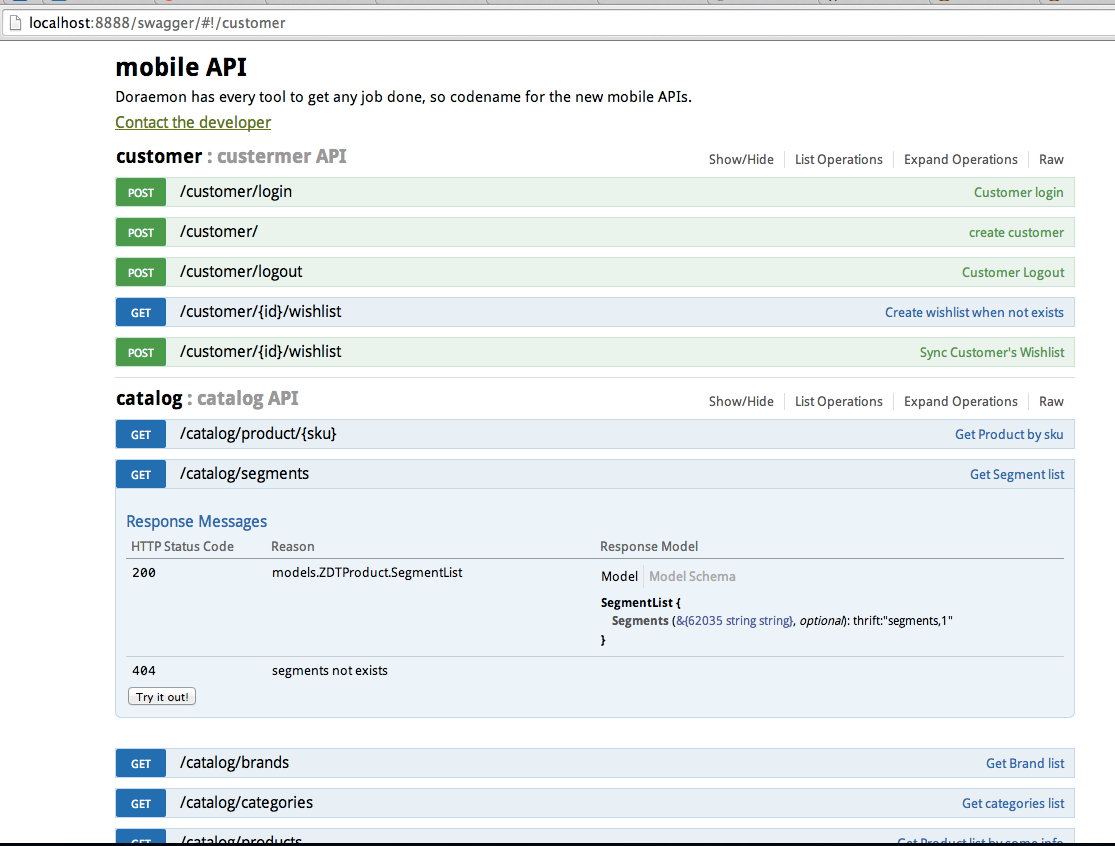
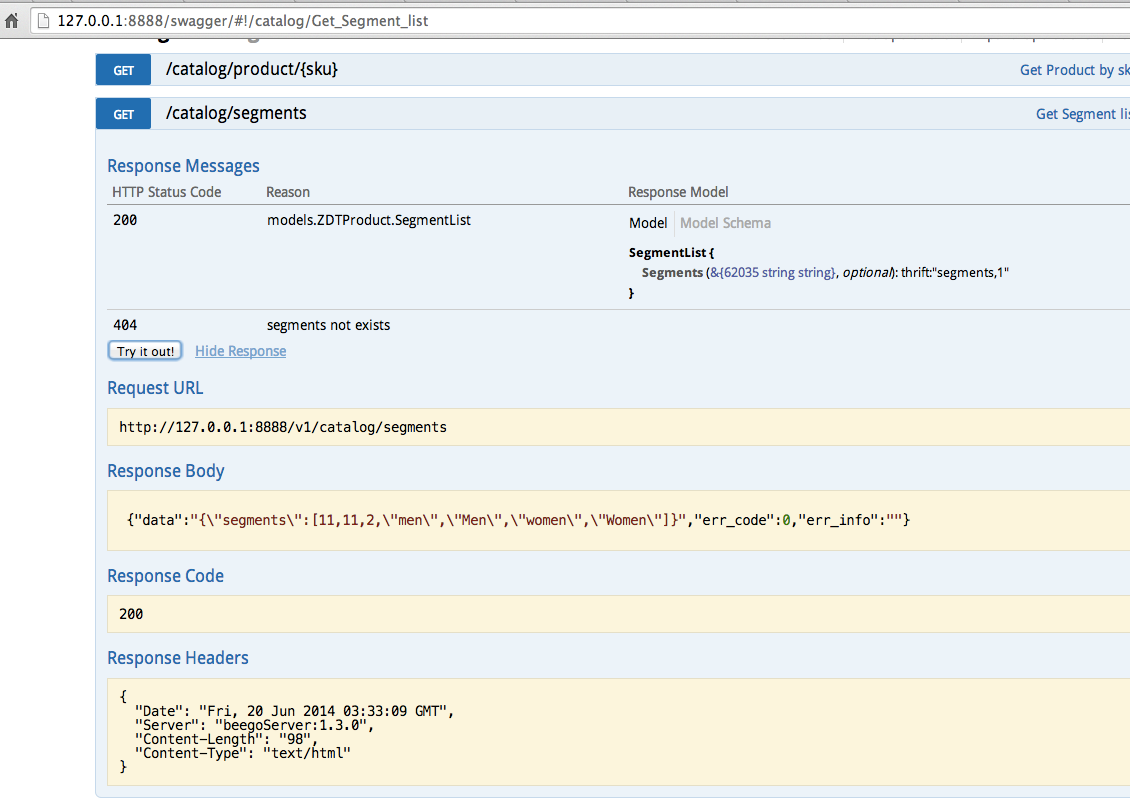
bee run -downdoc=true -gendoc=trueを使用してください。 - Visit
swagger document from API project's URL and port. (see item #1 below) 5.訪問APIプロジェクトのURLとポートから闊歩ドキュメント。 (以下の項目# 1を参照)
APIドキュメントが利用可能になりました。ブラウザを開いて、それを確認してください。
Problems You May Have
-
CORS Two solutions
-
Integrate
swaggerinto the application. Download swagger and put it into project folder. (bee run -downdoc=truewill also download it and put it into project folder) And beforebeego.Run()infunc main()ofmain.goif beego.RunMode == “dev” { beego.DirectoryIndex = true beego.StaticDir["/swagger”] = “swagger” }
And then visit
swaggerdocument from API project’s URL and port. 2. Make API support CORSctx.Output.Header("Access-Control-Allow-Origin", "*") -
-
Other problems. This is a feature used in my own project. If you have some other problems please fire issues to us.
-
他の問題。これは私自身のプロジェクトで使用する機能です。いくつかの他の問題が発生した場合、我々に問題を報告してください。